How to re-putty a window: the complete step-by-step method
Hacking out, priming, bedding, sprigging, knifing the bevel and painting — the full sequence for re-puttying a timber window, with the tools, the timings and the mistakes that cost people the job.
Re-puttying is one of the last building jobs where a competent amateur, working slowly, gets a result indistinguishable from a professional’s. The material is cheap, the tools are two knives, and nothing about it is difficult. What it demands instead is patience and sequence — do the steps in the wrong order and you will be doing them all again in two years.
This is the full method for a single-glazed timber window. If your window holds a sealed double-glazed unit, stop here: linseed putty will destroy its edge seal, and you need a different material entirely.
Before you start: is this a re-face or a re-glaze?
Two different jobs hide under “re-puttying”, and they take very different amounts of time.
A re-face leaves the glass where it is. You cut the external fillet off down to the glass line, leave the back bedding undisturbed, and knife a new fillet on. Perhaps forty minutes for a sash. This is the right call whenever the glass is sound and the back bedding has not failed — which is most of the time, because the outside face is what weathers.
A full re-glaze takes the pane out. You need this if the glass is broken, if the pane rattles when you tap the frame, if the back bedding has perished, or if the rebate underneath is rotten. Budget an afternoon per sash and be ready to replace glass you break.
Start by tapping gently around the pane with a knuckle. A dull, solid response means the bedding is intact. A rattle or a hollow tick means it has gone, and a re-face would only be papering over it.
Tools and materials
Nothing here is exotic and most of it is cheap.
- Hacking knife — the heavy, wedge-bladed knife made for chopping old putty out. A stout old chisel does the same job less comfortably.
- Putty knife — a stiff blade with a clipped point. Buy a decent one; a flexible bargain knife cannot cut a straight arris.
- Pin hammer and a wide firmer chisel for the sprigs.
- Pincers or fine long-nosed pliers to pull old sprigs.
- Heat source — a heat gun with a low setting, or better, an infrared paint softener. Read the safety section before using either.
- Glazing sprigs, a small box.
- Putty — linseed oil putty for primed timber; metal casement putty for steel or dense hardwood. Reckon 3–5 metres of fronting per kilogram, and buy over.
- Solvent-borne wood primer, a brush, and eventually your finish paint.
- Gloves, eye protection, dust sheets.
Step 1 — Set up and protect
Work outside where you can, or take the sash out and work on a bench with the glass horizontal; gravity is a considerable ally, and every professional glazier who can lay a sash flat does. Sheet the ground beneath the window to catch debris — this matters more than it sounds, because old putty and paint fragments may contain lead.
If the window is at height, stop and think about access properly. More putty jobs go wrong from a wobbly ladder than from a bad knife stroke.
Step 2 — Soften the old putty
Putty that has been in place for decades is close to stone. Attacking it cold turns fifteen minutes of work into an hour of chiselling and roughly triples your chances of cracking the glass.
Warm it instead. A heat gun on its lowest setting, kept constantly moving along the fillet, softens the surface in seconds. An infrared softener is slower, gentler and much safer around old paint because it works well below the temperature at which lead paint starts to fume.
Three rules:
- Keep heat off the glass. Glass cracks from thermal shock, and old glass cracks readily. Angle the gun at the putty, not across the pane, and never park it in one spot.
- Never use a naked flame. On dry old timber, in a rebate full of paint and oil, this is exactly how window frames catch fire.
- Assume the paint contains lead on anything decorated before 1992 in the UK, and much more certainly on anything pre-war. Overheating lead paint produces fume. An infrared softener, worked below about 250 °C, is the controlled way to do this.
Step 3 — Hack out the old fillet
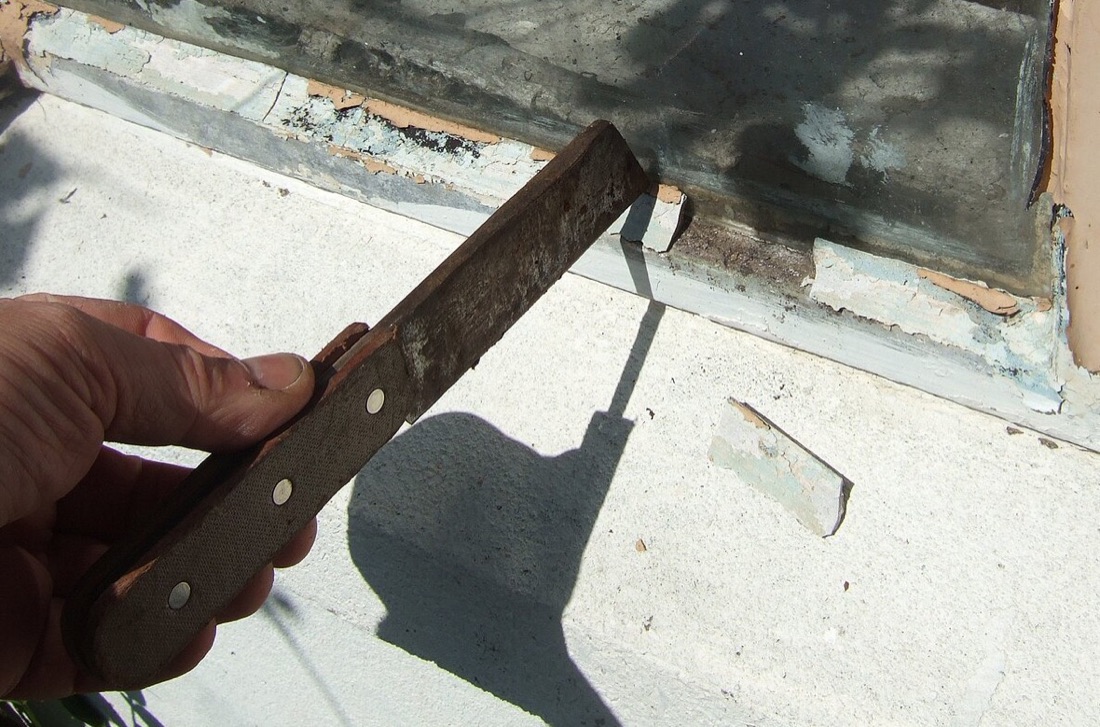
The hacking knife in use. Photograph by Andy Dingley, via Wikimedia Commons, cropped, CC BY-SA 3.0.

Work the hacking knife into the joint between putty and timber and tap the back of it with the hammer, driving down towards the frame — never towards yourself, never levering against the glass. Take the fillet off in short sections and let the chunks break away as they want to.
Where the putty is genuinely petrified, a fine chisel worked along the timber line, or an oscillating multi-tool used with great restraint, will break it up. Some restorers use a small angle grinder with a diamond disc for the worst cases; it is fast, it is loud, it creates exactly the dust you do not want, and one slip cracks the pane.
Get every crumb out. New putty applied over old fragments cannot bed against the timber, and will telegraph every lump through the finished bevel.
Step 4 — Pull the sprigs and, if re-glazing, take out the glass
Old sprigs are almost always corroded. Grip each head with pincers and roll it out; if there is no head to grip, tap it sideways until it lifts. Replace them all — a rusted sprig is a rust stain waiting to bleed through your paint.
To remove the pane, work around the edges once the fillet and sprigs are gone, easing the glass free of the back bedding with a thin blade. Support the pane with your other hand the whole time. If it will not come, more of the back bedding is still gripping — go back round it rather than pulling harder.
Step 5 — Inspect and repair the rebate
This is the step people skip and the reason jobs fail.
With the rebate exposed, press a bradawl or a screwdriver point into the timber, especially in the bottom corners where water sits. Soft, spongy, or dark timber is rot, and putty applied over rot will fail again with the rot underneath it. Small areas can be cut out and filled with a two-part epoxy repair system designed for joinery; a bottom rail that gives way along its length needs a splice repair, which is a joinery job in its own right.
Scrape the rebate back to sound material and get it clean and dry. Any moisture left in the rebate now is moisture sealed behind your new putty in an hour’s time.
Step 6 — Prime the rebate
Do not skip this and do not do it casually. Bare softwood draws the linseed oil straight out of fresh putty, leaving a chalky, uncured ring that lets go in sheets a season or two later. It is the single most common cause of putty failure in Britain, and the fix costs ten minutes and a brushful of primer.
One coat of a solvent-borne wood primer over the whole rebate — seat, upstand and especially the end grain in the corners. Let it dry as the tin says. Where you are finishing hardwood clear, use a timber sealer instead; hardwood needs sealing for the opposite reason, because it absorbs so little that putty struggles to cure against it.
Steel frames get the same treatment in their own idiom: wire-brush to bright metal, treat any rust properly, prime with a metal primer.
Step 7 — Knead the putty
Take a lump the size of your fist and work it in your hands for two or three minutes until it warms, softens and turns slightly glossy. Correctly kneaded putty holds its shape without slumping and leaves your hands more or less clean.
- Crumbly and short? Keep kneading; if it is still breaking up, work in a few drops of raw linseed oil.
- Greasy and sticking to everything? Roll it out on clean brown paper or newspaper for a minute — the paper draws off the free oil.
A cold tub in winter is worth standing somewhere warm for an hour first. Not on a radiator: that skins the surface over a cold core.
Step 8 — Bed the back putty
Roll a rope of putty between your palms and press it into the rebate all the way round with your thumb, a few millimetres proud of the seat. Continuous is what matters — every gap you leave is a place for water to stand against the glass edge for the next fifty years.
Step 9 — Set the glass
On anything bigger than a small pane, drop setting blocks into the bottom rebate at roughly the quarter points, so the glass rests on them rather than squeezing the bed out completely at the bottom.
Offer the pane in, press it home at the corners first, then work round the edges until the back bedding squeezes down to a consistent 1–2 mm. Press only on the edges of the glass — pressure in the middle of a pane is how panes break.
Sight along the glass. It should sit evenly in the rebate with a consistent margin all round, and there should be a continuous, unbroken line of squeezed-out putty visible from the inside.
Step 10 — Fix the sprigs
Sprigs, not putty, hold the glass. Fit them every 200–250 mm around the pane, and never fewer than two per side.
The professional technique is worth copying exactly: lay a wide firmer chisel flat on the glass, set the sprig against its edge, and drive it in by sliding the chisel along the glass. Because the tool is flat on the pane it cannot dip, and the sprig cannot veer up into the glass. Tapping sprigs in freehand with a pin hammer works, right up until the moment it doesn’t.
Step 11 — Front the fillet
Press fresh putty firmly into the rebate all round, over the sprigs, deliberately overfilling. Use your thumb and press hard — voids behind the fillet are invisible now and obvious in three years.
Step 12 — Knife the bevel
The part everyone worries about, and the part that most rewards confidence.
Hold the putty knife at a shallow angle with one edge riding on the glass and the tip against the timber arris. Draw it along the whole side in one continuous stroke, cutting the surplus off cleanly. Stopping halfway and starting again is what produces a wavy, patched-looking line.
Aim to finish the putty face about 2 mm below the sight line, so that the fillet is invisible from indoors and the paint has a clean landing. Cut the mitred corners last, working from each corner outwards.
If the knife drags, wipe it on a rag or dip it in a little water between strokes. If the putty tears rather than cuts, it is too cold or too dry — knead a little more oil into the next lump.
Then go inside and knife the squeezed-out back bedding flush, sloping away from the glass. A neat inside line is what separates a proper job from a passable one.
Step 13 — Brush the fillet
Draw a soft brush along the finished fillet. This closes the surface, beds the putty tight against both the glass and the timber, and takes the knife marks out. On a warm day, dampen the brush very slightly.
Step 14 — Clean the glass now
Take the smears off while they are soft, with a dry cloth and a little whiting powder if you have it. Cured linseed oil on glass is a genuinely unpleasant job to remove, and it will be cured by tomorrow.
Step 15 — Wait, then paint
The putty must skin before it can be painted, and it must be painted before it weathers.
| Stage | Timing |
|---|---|
| Skin forms | 2–4 days in mild dry weather |
| First coat of paint | 7–21 days |
| Final coat | within 28 days |
Test with a fingertip: when the surface is firm and takes no print, it is ready. Carry the paint 1–2 mm onto the glass — that overlap seals the joint between putty and glass and is the entire reason the paint is there. Cut the line with a good brush and scrape off any excess once it is dry.
Cold or shaded elevations stretch every one of those figures — see painting glazing putty for the full schedule. A north face in February can take three weeks to reach a paintable skin, and nothing will hurry it: putty cures by taking up oxygen, so warmth and moving air help, and heat guns simply skin the surface over a soft core.
The five mistakes that cost people the job
- Not priming the rebate. The oil is drawn out of the putty and the fillet fails within a couple of seasons.
- Puttying onto damp timber. No bond, and water sealed in behind the fillet.
- Leaving it unpainted. One British summer of UV on bare putty crazes it right through.
- Skipping the sprigs, or fitting three where nine belong. The putty is not the fixing.
- Using linseed putty on a sealed unit. The unit fogs, and the only remedy is a new unit.
Safety, briefly but seriously
- Linseed-oil rags can ignite without a spark. The oil oxidises, generates heat, and a crumpled pile insulates that heat until it smoulders — sometimes within hours. Lay rags out flat to dry outdoors, or drop them into a lidded metal container of water. Never leave a heap in a bin or a van overnight.
- Assume lead in any paint applied before 1992, and possibly in the putty itself if the window predates the 1960s. Some mid-century compounds also contained asbestos fibre. Never dry-sand or power-grind old putty or paint; work wet or with controlled low-temperature heat, sheet up, collect the debris, and wash before eating.
- Glass and chisels. Gloves and eye protection every time. Tap towards the frame. Get help with anything above head height.
On a box sash there are a few extra considerations — glazing bars, historic glass and listed-building status — covered in glazing putty for sash windows.
Done properly, this job outlasts almost everything else you will do to the house. There are Georgian sashes in Britain still weathertight on their original fillets — kept alive by nothing more than a coat of paint every few years.
Independent guidance — nothing sold here and no manufacturer sponsorship; product links on our comparison page are Amazon affiliate links. Spotted an error? Tell us and we'll correct it.